javascriptで投稿カレンダーを作りたいけどどうやるの??

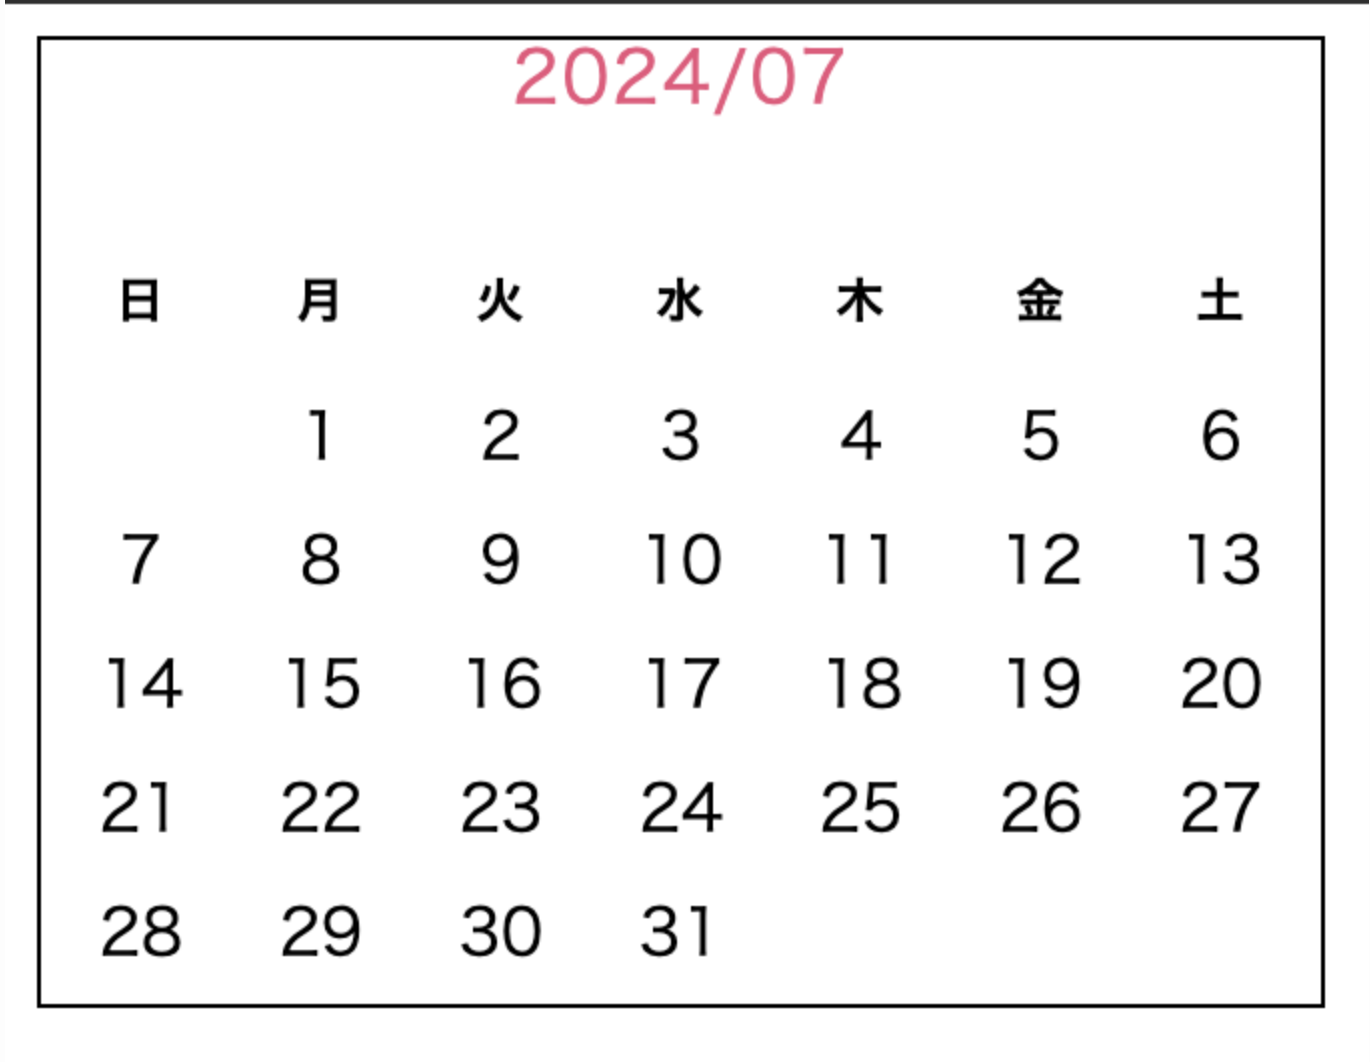
画像のようなカレンダーを作りたいけど、全く実装方法が思いつかない。
案件でカレンダーを実装したので、方法をまとめます。
コード例
まずは実際のコード例です。
See the Pen カレンダー部分のみ by 勇飛高松 (@ngcorrsc-the-solid) on CodePen.
2024/07月のカレンダーを表示できました。
javascriptのコードの最下部にある下記の部分を変更することで、表示月は変更できます。
const year = 2024;
const month = 6; // 0から始まるため6は7月
次の章でコード解説します。
コード解説
HTML
<div class="side-calendar">
  <div class="side-calendar__header">
    <a class="side-calendar__year-month">2024/07</a>
  </div>
  <table class="side-calendar__body">
    <thead>
      <tr>
        <th class="side-calendar__day">日</th>
        <th class="side-calendar__day">月</th>
        <th class="side-calendar__day">火</th>
        <th class="side-calendar__day">水</th>
        <th class="side-calendar__day">木</th>
        <th class="side-calendar__day">金</th>
        <th class="side-calendar__day">土</th>
      </tr>
    </thead>
    <tbody class="side-calendar__dates">
      <!-- 日付のセルを動的に生成 -->
    </tbody>
  </table>
</div>
HTMLのポイントは以下二つです。
①tableタグを使うこと
→thに日〜土曜までの曜日を表示させます。
→trがカレンダーの1行分
→tdに各日付が入ります。下記のようなイメージです。
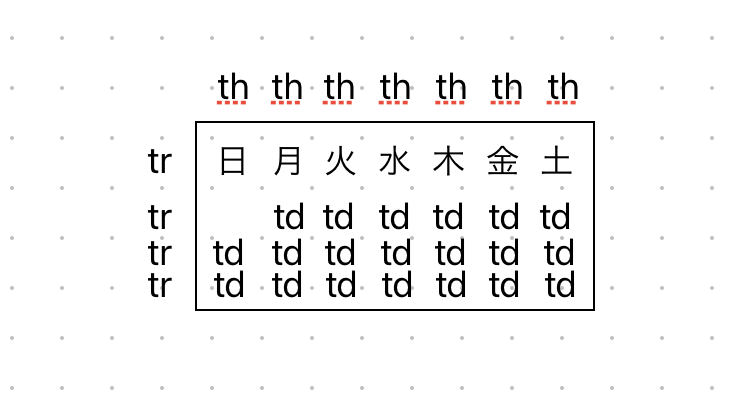
②日付部分は自動生成なので空欄にします。
→tbodyは日付部分です。ここは月によって並べ方と数字が変わるため空欄にします。
CSS
cssは特に変わった箇所はないので割愛します。codepenからコピーしてください。
javascript
document.addEventListener('DOMContentLoaded', () => {
  // カレンダーの日付を表示する要素を取得
  const calendarBody = document.querySelector('.side-calendar__dates');
  const today = new Date(); // 現在の日付を取得


  const generateCalendar = (year, month) => {
    // カレンダーの中身を初期化(前の月のデータをクリア)
    calendarBody.innerHTML = '';

    // 指定した年月の1日が何曜日かを取得(0:日曜, 1:月曜, ..., 6:土曜)
    const firstDay = new Date(year, month, 1).getDay();

    // 指定した年月の日数を取得
    const daysInMonth = new Date(year, month + 1, 0).getDate();

    let date = 1; // カレンダーに表示する日付
    const rowsNeeded = Math.ceil((daysInMonth + firstDay) / 7); // 必要な行数を計算

    // 行(週単位)を作成
    for (let i = 0; i < rowsNeeded; i++) {
      const row = document.createElement('tr'); // 新しい行を作成

      // 列(曜日ごとのセル)を作成
      for (let j = 0; j < 7; j++) {
        const cell = document.createElement('td'); // 新しいセルを作成

        if (i === 0 && j < firstDay) {
          // 1週目で月の初日より前の曜日は空白にする
          cell.textContent = '';
        } else if (date <= daysInMonth) {
          // その月の日付を埋める
          cell.textContent = date;
          date++; // 次の日付へ
        } else {
          // その月の日付が終了したら空白のセルを埋める
          cell.textContent = '';
        }

        row.appendChild(cell); // 行にセルを追加
      }
      calendarBody.appendChild(row); // カレンダーに行を追加
    }
  };

  // 固定された年月でカレンダーを生成(2024年7月)
  const year = 2024;
  const month = 6; // 0から始まるため6は7月
  generateCalendar(year, month);
});
①まずは初期値を設定
    // 指定した年月の1日が何曜日かを取得(0:日曜, 1:月曜, ..., 6:土曜)
    const firstDay = new Date(year, month, 1).getDay();
・今回の場合だと、yearには2024 monthには6が入ります。
jsのカレンダー関数は、0始まりです。したがって6は7月を意味します。
また曜日は、日曜=0 月曜=1という感じで数字を返します。
2024/7/1は月曜日なので、firstDayには1が入ります。
// 指定した年月の日数を取得
const daysInMonth = new Date(year, month + 1, 0).getDate();
この部分では、指定した月の最終日の数字を取得します。
new Date(year, month + 1, 0).getDate();
の部分で、monthにプラス1をすることで次の月を取得。
次の月の0日目という指定をすると、前の月の最終日を取得する仕様です。
const rowsNeeded = Math.ceil((daysInMonth + firstDay) / 7); // 必要な行数を計算この部分で、カレンダーに必要な行数を取得します。
具体的な数字を入れてみます。
daysInMonth = 31;  // 7月は31日
firstDay = 1;  // 7月1日は月曜日(1)

daysInMonth + firstDay = 31 + 1 = 32
最終的に出てくる、32という数字はカレンダーに必要なtdの数です。
Math.ceil(32 / 7) = Math.ceil(4.57) = 5その数値を7で割りくり上げて出てくる「5」という数字が、カレンダーに必要な行数。
trの数です。
②trの数分ループして、trを出力する。
for (let i = 0; i < rowsNeeded; i++) {
      const row = document.createElement('tr'); // 新しい行を作成
事前に計算したtrの数分、ループを回します。
今回は5回です。
createElementでtrを作成します。
③trの中で、7回ループを繰り返し日付を出力する。
// 列(曜日ごとのセル)を作成
    for (let j = 0; j < 7; j++) {
        const cell = document.createElement('td'); // 新しいセルを作成
ループの入れ子を作ります。
これでtr一行分に対して、tdが7個表示できるl
④tdに数字を入れる。
     if (i === 0 && j < firstDay) {
          // 1週目で月の初日より前の曜日は空白にする
          cell.textContent = '';
        } else if (date <= daysInMonth) {
          // その月の日付を埋める
          cell.textContent = date;
          date++; // 次の日付へ
        } else {
          // その月の日付が終了したら空白のセルを埋める
          cell.textContent = '';
        }

        row.appendChild(cell); // 行にセルを追加
cell.textContent = date;で日付を出力しています。
1行目の条件文は、前の月の日付は空白にするという処理です。
以上です。
まとめ
今日はjsでカレンダー機能を作る方法について解説しました。
①tableタグで曜日と日付を表示させる箱を作る
②ループでその月に必要なtrを繰り返す
③trの中で日付を順番に入れていく。
という方法で実装できます。
少し複雑でわかりづらい箇所はあると思うのですが、
この記事が実装の参考になれば幸いです。
もしも質問などあれば、コメント欄かXのDMよりお気軽にご連絡ください。


コメント